Stay Cool, Stay Connected! 🌟
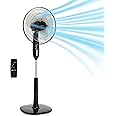
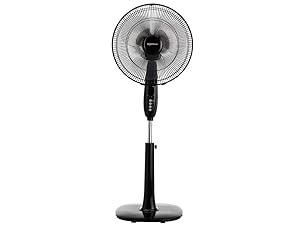
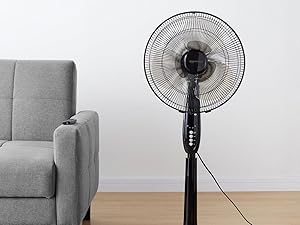
The Amazon Basics 16" Pedestal Fan is designed for medium to large rooms, featuring a powerful yet energy-efficient 60W motor. With 3 speed settings and 3 breeze modes, this fan ensures personalized comfort. Its adjustable height and tilt head allow for customized airflow, while the remote control offers convenience from anywhere in the room.


| Item Weight | 12.3 Pounds |
| Item Dimensions D x W x H | 15.75"D x 17.72"W x 53.15"H |
| Voltage | 120 Volts |
| Switch Type | Pull Chain |
| Indoor Outdoor Usage | Indoor |
| Control Method | Remote |
| Efficiency | energy-efficient |
| Is Electric | Yes |
| Number of Power Levels | 3 |
| Number of Speeds | 3 |
| Wattage | 60 watts |
| Number of Blades | 3 |
| Power Source | Corded Electric |
| Room Type | Bedroom |
| Additional Features | Oscillating, Remote Controlled, Adjustable Height, Adjustable Tilt, Timer |
| Recommended Uses For Product | Cooling, Air Circulation |
| Mounting Type | Pedestal Fan |
| Controller Type | Remote Control |
| Finish Types | Powder Coated |
| Electric Fan Design | Floor Fan |
| Style Name | 3-Speed AC Motor Fan |
| Color | Black |
| Blade Material | Plastic |
| Material Type | Metal |
M**.
The Fan Is Great. Their directions SUCK but here are better ones ;)
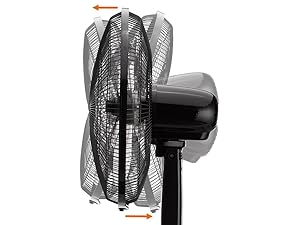
Well, here I am a year later to report this oscillating fan suddenly decided to do something VERY bad. It put out a loud electrical 'snap' & the fan blades stopped working. Oh, it still oscillates but it can't go fast enough going just side-to-side to generate a breeze. Of course this happened just one week past it's one year warranty. (LOL) I do like the fan, so I'll probably buy another next Spring.As to my original review: If you’re looking for a very nice oscillating fan with an excellent remote this one is a very good value. HOWEVER, first you have to assemble it. If I didn’t know better & it didn’t have the AmazonBasics® logo I swear the instructions were designed by IKEA®. [Anyone who’s ever tried to assemble that particular brand of furniture knows what I’m talking about.] I guess when they say 'Basics', they mean it.For those who are considering purchasing this item & wants to escape [most of] the assembly frustration here are some of the high points NOT covered in the instruction manual:1) Go ahead & unpack everything. You will find all the parts there… someplace, somewhere.2) Assembly of the base is dead easy. Pg. 6- 7. Unscrew the knob off the bottom, insert the stand & tighten the knob.3) Following the directions…what little there are…slide main unit onto standard & tighten those knobs. I should mention that the LOWER knob is the one you loosen/tighten in order to extend the fan higher or lower. The other knob secures the main housing to the extendable arm. This isn’t mentioned till page 13. But, so far, so good. Now comes the good parts!4) Remove the large fan blades off the back of the unit. Remove the Star Trek insignia shaped piece of plastic which is clipped to the blades. (I couldn’t for the life of me figure out what that thing was doing there or if I should take it off. It certainly looks like it belongs but it eventually it dawned on me this was just basically excess material.) Go ahead and toss it because it’s what’s known in the vernacular as a pocket part…just something they stuck on & it looks like you need it but it’s never mentioned. Put the blades aside for now.5) Look on the shaft sticking out on the base. That’s where the knob you’ve been looking for is. It's not mentioned but you need a pair of pliers to hold the shaft while you turn the knob RIGHT in a reverse fashion to unscrew it. DON’T mess with the pins sticking out of the shaft, you’ll need them later. [Note: this is the opposite of the normal ‘lefty-loosey, righty-tighty’]6) Now that you have the knob off go ahead & slide that black sheath off the post. Guess what, you get to throw that away too! It took me probably 15 minutes to figure out the blades’d never fit on the shaft with the sheath on. Turns out that piece wasn’t needed, either. Please note its presence is not mentioned anywhere in the directions.7) Now that you have all the nice things they never told you about out of the way, go ahead and unscrew the fixing ring of the main unit’s front. You can do this by hand. Mount the rear fan guard onto the shaft with the 2 pin holes facing up & the single pin facing down.[You’re still on page 7] Screw on the fixing ring [not the small screw you took off the shaft] until it’s hand tight.8) Now slide the large blades onto the shaft. If you look on the base of the fan blades you’ll see a small notch which has to be aligned with the pins on the shaft. You have to twist around & back to see the slot. Line them up & slide on the blades.9) The smaller blades (this is a dual blade set) slide onto the shaft next with the tiny teeth facing out. [Didn’t think I’d make you guess, did you? The manufacturer did.] Now use that small knob you took off the shaft in Step 5 to affix all the blades in place. Remember, this is ‘left-to-tighten’ instead of the normal ‘turn right for tight’.10) NOW comes the super fun part & it's definitely not in the directions. Take the main unit back OFF the base and lay on something flat like a bed or the floor. At this point I needed a VERY small Phillips head screwdriver (~1/32”), a 2nd person & a few strips of duct tape to manage this step.11) There is a rubber strip with a screw at the bottom you have to wrap around the back fan guard, blades and all & the front one at the same time with everything EXACTLY lined up. The part with the screw goes at the bottom of the guards. You can’t hold the 2 parts together easily, so that’s where the duct tape comes in. I used 3 1”x ¼”strips, [though if you strip 2 or 3 twist ties down to the wire & use them to secure pieces I think they’d work even better], just enough tape to help plus my spouse to hold the front & back guards together while I fit the rubber ring around them.This step took more than 30 minutes to accomplish with the guards sliding all over the place, the duct tape coming loose because you can’t leave it on, trying to open the ring just enough to let it go around the 2 pieces, fitting the ring's track around both while my husband’s using a magnifying glass to see well enough to tighten the screw all while I’m trying to hold everything stable with pillows stuffed around the base to keep it from turning & twisting. Get the idea? I think we both learned a few new 4 letter words with this last step.If you don’t have the type of screwdriver in your home toolbox you can get one in the eyeglass repair kits at the local CVS or Walgreens. They’re about 5 bucks so. Once you get it tightened, you should be done. Don’t bother looking for a nut on the end of the screw as there isn’t one, which is a very strange design. Normally this means you can’t keep loosening/tightening the screw without stripping the mounting. I wouldn’t know; once we got started with tightening of the screw we just kept going as best we could until we got both guards together.12) Replace the main unit back on the stand & tighten the knobs.13)The remote is nothing after all that. Slide off the cover, pop in 2 AAA batteries, slide the cover back on & you're good to go.I will say it’s really nice to have a remote-controlled oscillating fan. I can control on/off, speed, mode, isolation & a timer for sleep. I just wish somebody taught AmazonBasics® how to write directions.
A**L
Best fan I’ve ever had, super strong and cooling!
I’ve had several fans in this style before but this one is the most strong, cooling fan I’ve ever used! It must be because it has the extra little fan blade in addition to the regular big fan blade. I have body temperature regulation issues and overheat very easily so this fan has been a huge game changer in my life! It’s especially been a life saver for when I work out because I tend to overheat so much when exercising. There has also been a heat wave for the past week with temps in the high 90s and low 100s, and I’m SO thankful I got this fan a few weeks ago because it’s keeping me so cool! My air conditioning was having trouble keeping up with the outside heat the other day when it was 105° and inside temp was 80°, I had this fan pointing directly at me on full blast and it kept me very cool.I love that there are different settings for the fan as well as the speed and oscillation. And I LOVE that it comes with a remote as I’m disabled and mostly bedbound so it’s very helpful to be able to change the settings from bed and not have to get up.Assembling it together wasn’t too difficult, the directions could use a bit more detail but I figured things out still. Also love the black color because white gets so much more dirty over time. The noise of the fan is pretty quiet which honestly I kind of like it when fans are loud because of the white noise effect, but I already have a white noise machine so it’s fine that the fan is pretty quiet compared to others I’ve had in the past.All in all I’m obsessed with this fan and it’s the best I’ve ever had!
R**M
Whisper Quiet
Why did you pick this product vs others?:I bought this fan to replace the Honeywell pedestal fan I owned when I discovered that the fan blades had cracked in the area where it attaches to the unit. I was ready to buy a new one, but it was no longer available. As a result; I had to find another type of fan. That’s when I found this fan. The first time I used it, I was thrilled with my purchased. This fan is far better than the Honeywell I owned. As a result, I bought two for my mother. One for her living room and the other for her bedroom. The following is a list of what I love about it. The blades are larger than my old one.1) It’s whisper quiet: This is especially important to me since I need the room to silent in order to fall asleep 2) It has more speeds and modes than my old oneThis are my things about it.3) It’s much lightweight4) The remote has plenty of buttons5) It can be programmed for up to 12 hours With all that being said, there are only things that can use improvement. 1) I wish the height was adjustable. Despite the fact that even my mother is loves hers, she wishes her bedroom fan had the ability to be lowered so it reaches more of her bed. 2) The remote could be larger and have bigger buttons. Other than that, I can’t say enough about how great this fan is.
J**E
Super Quiet, instructions a miss
Powerful, quiet, great airflow. Love it in my kitchen! Great deal at $40. However, the instructions are bad. So, minus a point. It's a 5 star fan.There is a V shaped piece that you must remove from the fan base and discard. Then step 4 makes sense.The screw driver needed for step 6 is not something people normally have. I have a #1 from an old Stanley kit (66-052) that is just right for the job.2 AAA batteries not included.Please don't be discouraged. It's super easy after you know to remove the V part. Please see pics.
Trustpilot
2 months ago
2 weeks ago